
Discussion Checkpoints Feature

May 07, 2026
 193
193
Overview: What are Discussion Checkpoints?
Discussion Checkpoints allow instructors to set multiple due dates for a single graded discussion. Historically, Canvas only allowed one due date per assignment, which often led to students waiting until the final hour to post both their initial thoughts and their peer replies.
With Checkpoints, you can now:
- Set a specific due date and point value for the Initial Reply.
- Set a separate due date and point value for Peer Replies.
- Automatically total these points into one gradebook column.
- Provide students with clear "To-Do" list items for each stage of the discussion.
Step-by-Step Instructions
1. Create or Edit a Discussion
- Navigate to Discussions in your course navigation and click + Discussion (or select Edit on an existing one).
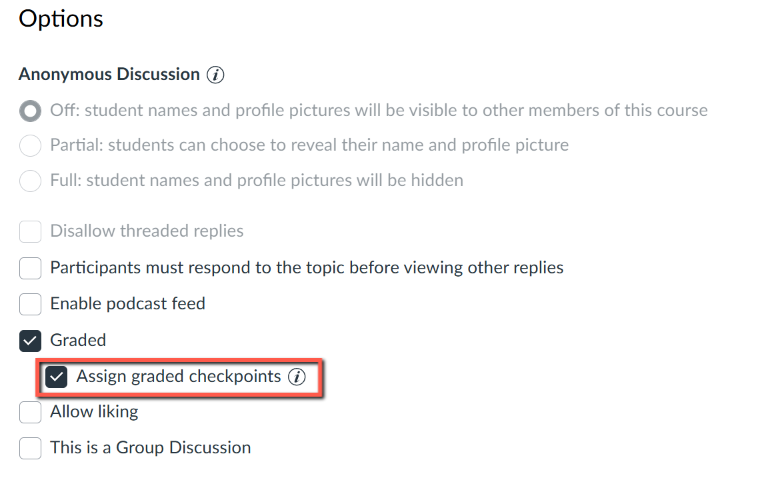
- In the discussion settings, scroll down to the Options section.
- Check the box for Graded.
- Once "Graded" is selected, a new option will appear: Assign graded checkpoints. Check this box.
2. Configure Checkpoint Settings
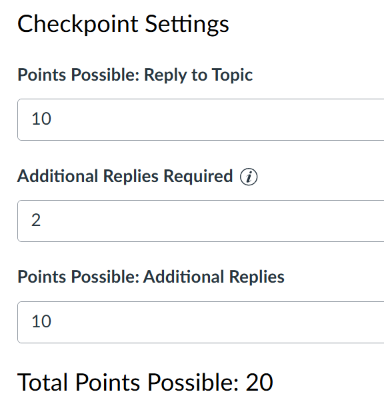
After checking the box, the "Checkpoint Settings" area will expand:
- Points Possible: Reply to Topic: Enter the points for the student's first post.
- Number of Additional Replies Required: Enter how many peer replies you want (e.g., 2).
- Points Possible: Additional Replies: Enter the total points for these peer replies.
- Note: Canvas will automatically calculate the Total Points Possible for the assignment based on the sum of these two fields.
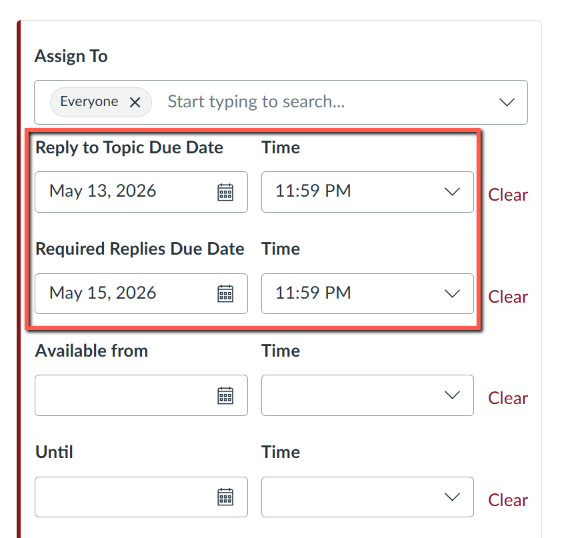
3. Assign Due Dates
Scroll down to the Assign box at the bottom of the page. You will now see two date fields instead of one:
- Reply to Topic Due Date: Set the deadline for the initial post (e.g., Wednesday).
- Required Replies Due Date: Set the final deadline for the peer responses (e.g., Sunday).
- Click Save & Publish.
Grading in SpeedGrader
When you open SpeedGrader for a checkpoint-enabled discussion:
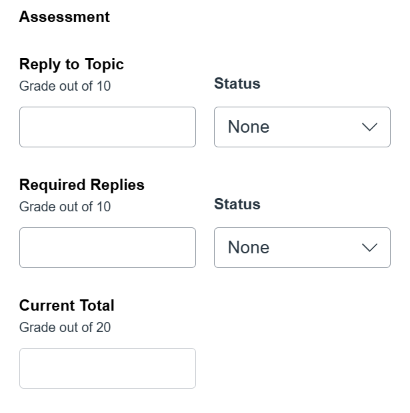
- Split Grading: You will see separate text boxes to enter grades for the "Initial Reply" and "Required Replies."
- Post Navigation: You can use the "Previous" and "Next" reply buttons within the student's submission to jump specifically between that student's different posts.
- Late Policies: If you have a course-wide late policy, Canvas will apply it individually to each checkpoint based on its specific due date.
Important Things to Know
- Groups: Checkpoints work with Group Discussions.
- Anonymous Discussions: Checkpoints cannot be used if the "Anonymous" option is enabled.
- Student View: Students will see a "View Due Dates" link on the discussion page, which opens a tray showing both deadlines and their completion status.
- Mobile App: Students should be encouraged to check due dates on a browser, as some versions of the Canvas Student App may only display the final deadline.
More Information & Resources
For a visual walkthrough and deeper dive into this feature, view the official release video from Instructure:

